


How to build EBB & Flood -hydroponic system
After growing chile plants with different hydroponic systems for nearly ten years, one hydroponic system still stands clearly ahead of them all: EBB & Flood.
Before using it or seeing in action it may seem a little complicated but after you get it, it's actually the most simple system there is!
It offers many advantages which made me update almost all of my hydroponic systems to EBB's:
- the most efficient hydroponic system yet still very simple! Gives unbelievable crops with decent nutrients and in a location with plenty light.
- possible to use any growing tray sizes you want with the same principle from tiny seedling EBB to system which is several meters long! You don't need super powerful pump for this, any low power aquarium will do, as you simply just need to have the growing container flooded with nutrient solution for minutes or seconds.
- plants can be transferred directly to EBB after germinating.
- EBB develops very strong decent roots with chile peppers which make it perfect for transferring the plants when needed. EBB & flood does this much better than any other hydroponic systems.
- you can grow all of your plants in one EBB and easily re-arrange or transfer them to other hydroponic systems or soil.
- no hydroponic pots of any kind needed.
- healthy plants and expanded clay minimizes the risk of any pests including aphids, spider mites, thrips, white files etc.
- EBB is very reliable and can be left alone for even weeks. (If the nutrient reservoir is big enough.)
- easy to integrate to balcony, to any table or growing corner. Very versatile system that can be built as you like to use it and as you want it to look.
- very easy to maintain, if you build your ebb properly, changing nutrient solution after each 2 weeks or so will be very easy and quick.
- very SAFE which makes it ideal for indoor growing. Properly planned EBB & flood won't spray the nutrients to the floor of your apartment as it's growing container rests on the nutrient container. All inlets and holes are in a place where dripping doesn't matter.
- EBB is also ideal for indoor growing as it's very silent even when the pump runs.
Some pictures at the end of this article to prove the power of EBB & flood.
Let's get started with some plans:
First you need to plan what kind of space you will have for you plants and plan your EBB according to that.
It's also good to remember that the plants can be HUGE even the ebb itself would be small, with a smaller reservoir you might just need to add water more often because of the evaporating and when the plants get thirsty and hungry when they are bigger.
You can also use big container and use only part of it's capacity to save some nutrients when still growing small plants.
No matter how small or big EBB you will build, the principle will be exactly the same as shown on this building example.
Here's the basic principle of the EBB & flood:

The growing container (upper part can be any shape you like).
For practical reasons, sizes like 60 x 60cm or 80x80cm and bigger are good to have as squares or near square rectangles so you can grow up to 4 huge plants even in s smaller EBB. The plants can grown "out of the EBB" when they grow larger, and believe me, they will!
For bigger ebb, I would recommend long but not too wide system, my 30 cm x 5 meter EBB has been ideal for efficient and easy growing. Also quite small reservoirs are just enough for them to save plenty of nutrients.
I once built a long AND wide EBB but that needs way too large container, and the 30cm wide (and meters long) EBB will result exactly as good results because the plant can grow outside the system. You can see pictures about this at the end of this article.
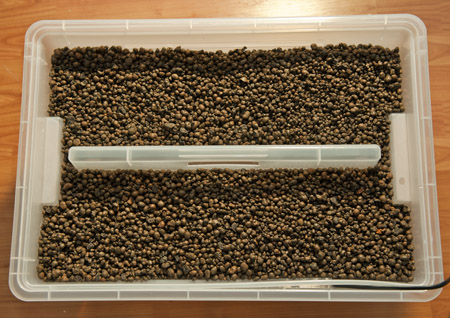
Back to the basic principle: the plant container (upper part) will be filled with expanded clay or vulcaponic or any similar growing medium.
The plants can be planted there in germinating rockwool cubes or in larger rockwool cubes is you like.
I often plant cuttings without rockwool and it works also very well.
This is how EBB then works:
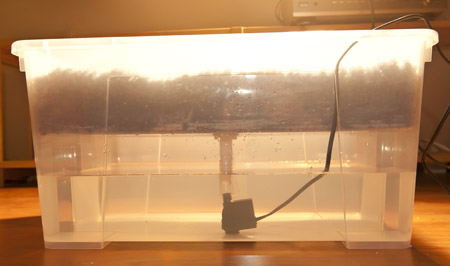
Timer is set to pump nutrient solution to upper tray couple times a day.
It floods the upper tray and waters the roots and expanded clay with nutrient solution. After a minute (or any time suitable for your ebb) the timer will turn off the pump and the nutrient solution pours back to nutrient container thru the pump. Overflow drain lets the excess water drain back to reservoir before the expanded clay starts to flow. Best is to set the timer to stop the pump when the water reaches overflow tube. The overflow should be adjustable just to make the incoming nutrient solution to raise enough to reach the roots of the plants.
That's it!
This happens a few times a day and and the roots will enjoy the moisture which has all the needed nutrients to grow rapidly and produce more pods you can use!
So why it is so efficient then?
First of all, with timer, the watering can be adjusted for different chiles as some like it more wet and some like more dry conditions. And of course it's good to water more during the summer when it's hot and less during the winter.
Second:
Many people are building very complicated aeros and different kind of systems which produce very tiny mist for the roots which they think is the most ideal. The idea of this is great, but you need expensive pumps that will consume more electricity and will also make much more noise and worst of all, they tend to break much easier.
Think about the roots after they have been flooded with EBB & flood.
They are in very well ventilated place where air circulates freely (between the expanded clay) and the moisture is so high that it's actually very fine oxygen-rich mist, better than any aero or misting system.
All this achieved with a cheap pump which is very silent and has very small wattage which runs only max few mins a day!
The more you think about this advantages, especially when seen the results of EBB & flood growing you should understand why I'm still building EBBs after using them (and many, many other kinds of hydros) for years!
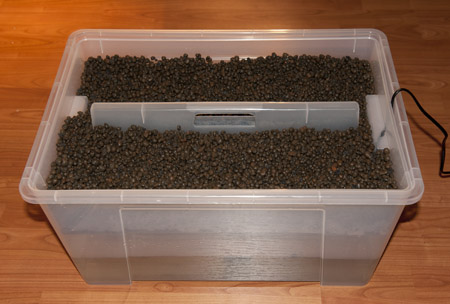
Let's find an appropriate container.
The one chosen here works very nicely as an example.
Transparent isn't ideal because roots and your nutrient solution don't like light at all.
This can be prevented by covering the container with plastic for example.
You can simply choose containers that aren't transparent from the beginning.
In this example, transparent is better as you can see thru the system on some pictures which makes it easier to understand the process of building and how EBB & flood works.
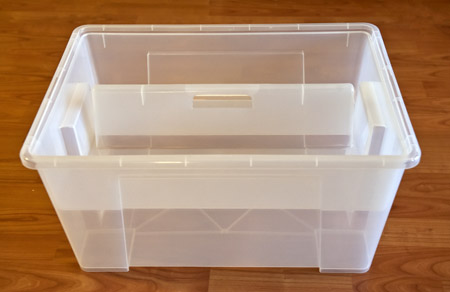
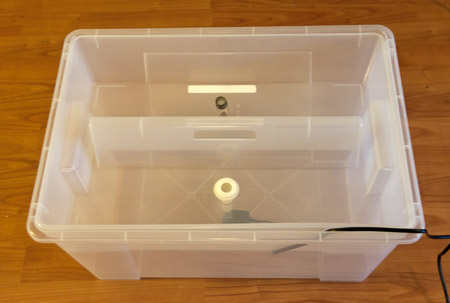
Here's the two-part box chosen for this example. you can use two completely different boxes too and just place the growing container on top of the reservoir or even use table in between.
Here are other parts used in this project:
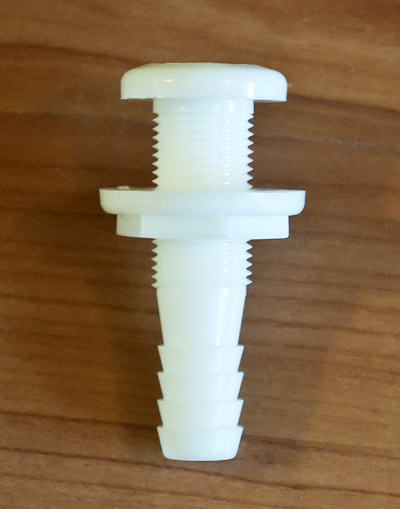
Inlet for the growing container.
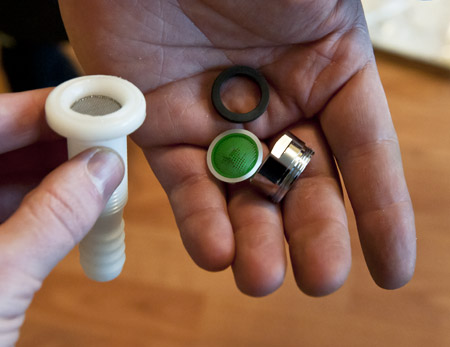
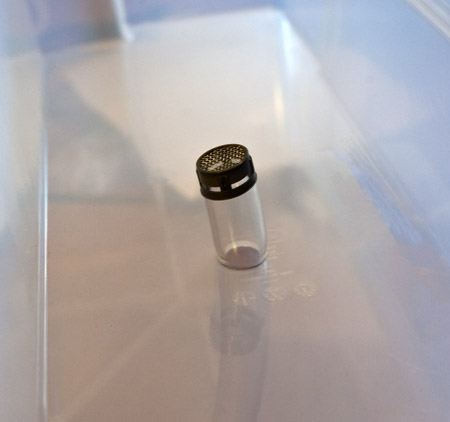
Roster net placed inside the inlet.
Taken from a faucet parts worth a few euros / bucks.
Prevents any small particles to enter your pump.
One good solution would be using plastic mosquito net instead.
This just looks better so we ended up using this in this article.
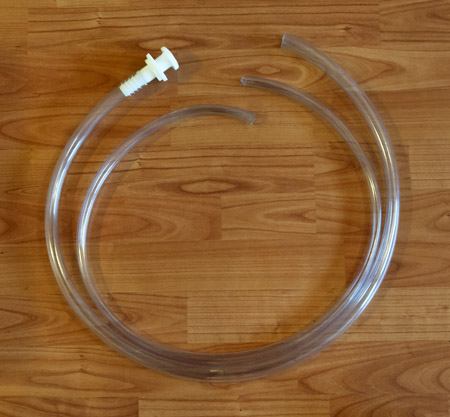
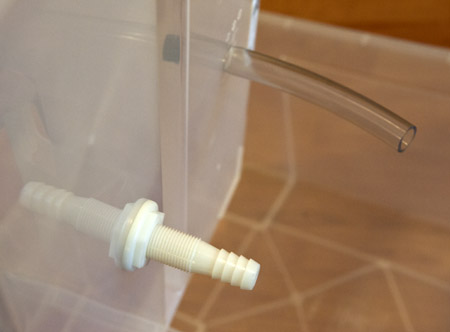
A pieces of hose, thinner is for the pump and thicker is for the overflow hose.

Overflow hose with a cheap faucet piece.
You can use plastic mosquito net instead.
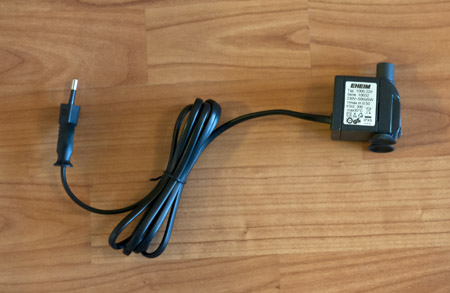
Here's the submersible pump used with this EBB & flood.
This same pump works also with much, much bigger EBB & flood system too.
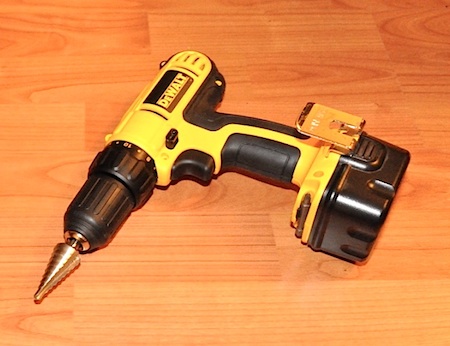
A drill bit attached to this cordless drill shown here is ideal for drilling holes to EBB containers.
The cut will be very smooth which is ideal especially for making an adjustable overfill tube very easily.
Okay, the actual work needed to do here shouldn't be too hard for anyone:
Drill the holes for the inlet and overflow tube:
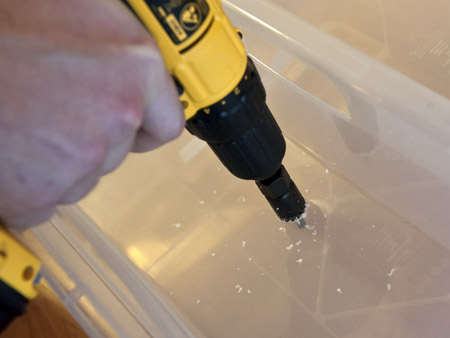
Drilling the hole for the inlet.
For the inlet part we chose, the hole doesn't have to be exact, just drill with this piece and try to fit the inlet when the hole looks close enough. If it doesn't fit yet, make the hole bigger and try again until it fits.

Here's the inlet in place on the EBB growing container.
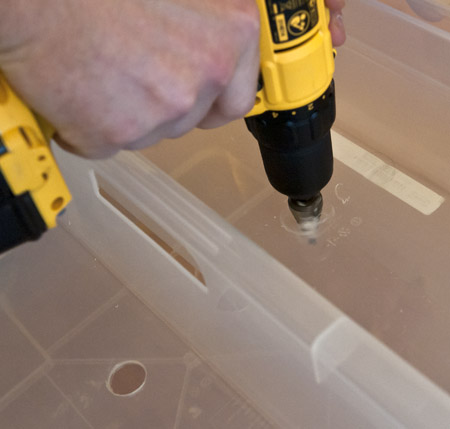
And now, drill the hole for the overflow. In this case, this one has to be more exact. in other words, it has to be smaller than the hose.
When the hole for the overflow is done, just force the overflow tube thru the hole and voilá! You got yourself an adjustable overflow! It's that simple.
If you accidentally make the hole too big, don't worry, just replace the overflow tube with bigger one.
Actually, the bigger the overflow tube is, the better it will work!
Here's the adjustable overflow tube in place.
Ok, so at this point, the EBB is almost done!
This is how it should look now from the bottom of the growing container.
Lets cut a piece of the hose for the pump & inlet.
Just estimate the length of the hose needed in between the pump and the outlet and attach it to inlet.

Here's the pump attached to inlet with a piece of hose.
At this point you can try to place the growing container on the reservoir (the container for the nutrients) to see if it fits. If the hose is too long, just cut a piece off from it until it fits perfectly.
Okay, the actual work has been done now. Lets look at the EBB now:
Okay, lets test drive the EBB & flood!
Pour in your washed expanded clay or similar medium.
(It's easiest to wash in a bag, just poke some holes to the bottom of the bag and run water thru the bag until the water is quite clear.)
Fill the reservoir with plain water, like halfway or so, doesn't matter at this stage.
Prepare to start timer on your watch or cellular etc.
Attach the power cord of the pump to turn it it.
Keep an eye on the water level, set the timer to turn off the pump when the water starts pouring from the outlet.
This is the approximated ideal time to run the pump for 2-4 times a day. With smaller systems this usually takes some seconds depending on your pump, if the pump is adjustable, set it to minimum to evenly spread the flood.
Adjust the pump run times according to available light, fe. If the light hits the plants at 8:00, you can flood the growing container around then. then for example at 12:00 and at 16:00 or 18:00 or whenever the sun / artificial light fades out / turns off. No need to run the pump during the darker hours.
At this point, you EBB / flood is ready for the plants!
You can move germinated plants or bigger seedlings to EBB.
TIP: use your EBB & flood as seedling growing system.
Basically, you can grow quite a few plants even in a small EBB at first.
Click here to get seeds for chile plants!
Click here for the germinating guide.
When the plants are big enough, just plant them into other EBBs or other hydroponic systems. Or to normal flower pots with soil or even bonsai pots. (Click here to learn about chile bonsai growing.)
I start ALL of my plants hydroponically which makes growing much easier and more fun.
Leave the best and healthiest plants to your ebb evenly, you can easily move plants from EBB to other systems later. EBB makes the replanting / repotting much less stressful for both you and your chile plants!
The actual planting is very easy. Just dig out some expanded clay (etc.) and place the rockwool cube in place and cover it with expanded clay. This actually takes just couple of seconds!
As said earlier in this article, an ideal amount of plants to grow in this system is 2-4 plants.
Just let the plants grow to separate directions and support them if needed.
EBB & flood system used in this example can be expanded for the future use.
In other words, when the plants are bigger and need much more nutrients, or you you need to take a vacation elsewhere etc. Just take out the growing container and place it on the nutrient container like this:
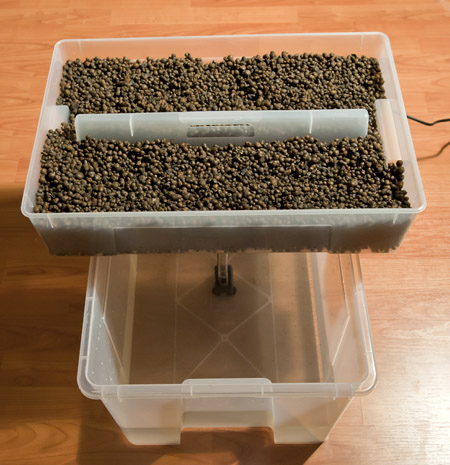
Just replace the hose with a longer one or extend the current in a way that it will reach the pump.
Most people who have tried proper EBB & flood system swear it's the best hydroponic system available at the moment.
At this time, I can really confirm this.
There are so many good sides with EBB & flood of growing. Best of all, it's FUN, exactly what growing chile peppers should be.
Happy hydroponic gardening!
And finally, few results of EBB & flood growing from the past seasons:

Hottest chinenses growing in EBB & flood system.
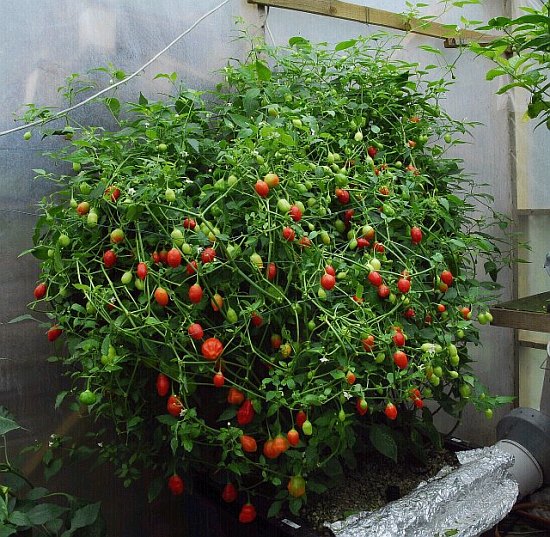
Inca Berry growing on EBB & flood in 2006.
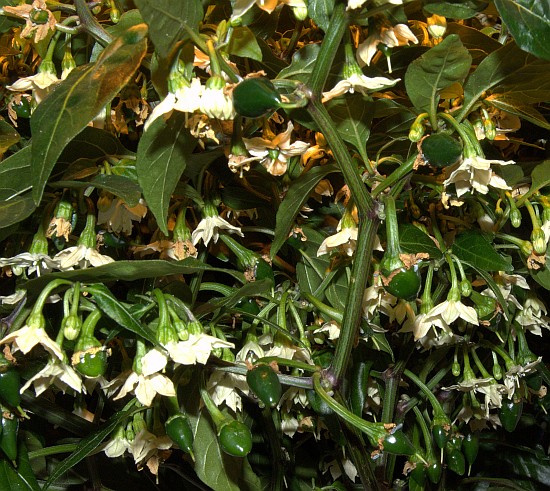
Dutch-Habanero F1 flowering in EBB & flood.

Clavo producing pods in EBB & flood.


Belize Red producing pods in EBB & flood.

EBB & flood growth in the middle of the season.

EBB & flood growth during the summer.

Healthy seedlings growing rapidly on EBB & flood.

On the left: plants producing in EBB & flood.

Immature CAP 220 pods in EBB & flood.

Mint growing in EBB & flood.

Lettuce and mint growing in EBB & flood.
![]() Finnish section for finding parts in Finland:
Finnish section for finding parts in Finland:
OSALUETTELO
https://www.fatalii.net/ebb
Reso + kasvatusastia: IKEA Samla
https://www.ikea.com/fi/fi/catalog/products/60102977
https://www.ikea.com/fi/fi/catalog/products/80102976
-> pienempi 45l versio löytyy myymälöistä
hinta: ~13€
Läpiviennit: Motonet veneosasto
https://www.motonet.fi/motonet/tuotteet/386343/0
-> Myös nk. sähköasennusten holkkitiiviste käy, saa sähkötarvikeliikkeistä ja rautakaupoista:
https://www.electratec.net/tuotteet.html?id=335/ IP65 -tasoinen pitää tähän tarkoitukseen tarpeeksi hyvin vettä.
hinta: ~2€/kpl
Letkut: K-Rauta, joustavaa läpinäkyvä muoviletkua sopivaksi omaan tarkoitukseen
-> tiivis ilman läpivientiäkin, menee myös tiiviisti sisäkkäin joten adaptereita ei välttämättä
hinta: muutaman euron tarpeen mukaan
Pumppu:
esim Eheim 1000 (pienin mahdollinen), saa akvaarioliikkeistä, esim:
https://www.akvaariokeskus.com/ab2005/tarvikkeet/muutekniikka_kiertovesipumput.htm
hinta: 10-25€ (eheim pari kymppiä)
Suodattimet läpivienteihin:
K-Raudasta "hanan pää"
-> sisältää useita suodattimia
hinta: muutaman euron
Tätä voi muunnella oman mielenkiinnon ja kunnianhimon mukaan, oman kokemuksen mukaan parissa viikossa on tapahtunut taimille jo melkoisesti. Lisää voipi kysellä vaikka ircnetissä #fatalii.net -kanavalla.